How to use prebuilt package on Windows10
This tutorial takes mmdeploy-1.3.1-windows-amd64.zip and mmdeploy-1.3.1-windows-amd64-cuda11.8.zip as examples to show how to use the prebuilt packages. The former support onnxruntime cpu inference, the latter support onnxruntime-gpu and tensorrt inference.
The directory structure of the prebuilt package is as follows, where the dist folder is about model converter, and the sdk folder is related to model inference.
.
├── build_sdk.ps1
├── example
├── include
├── install_opencv.ps1
├── lib
├── README.md
├── set_env.ps1
└── thirdparty
Prerequisite
In order to use the prebuilt package, you need to install some third-party dependent libraries.
Follow the get_started documentation to create a virtual python environment and install pytorch, torchvision and mmcv. To use the C interface of the SDK, you need to install vs2019+, OpenCV.
:point_right: It is recommended to use
pipinstead ofcondato install pytorch and torchvisionClone the mmdeploy repository
git clone -b main https://github.com/open-mmlab/mmdeploy.git
:point_right: The main purpose here is to use the configs, so there is no need to compile
mmdeploy.Install mmpretrain
git clone -b main https://github.com/open-mmlab/mmpretrain.git
cd mmpretrain
pip install -e .
Prepare a PyTorch model as our example
Download the pth resnet18_8xb32_in1k_20210831-fbbb1da6.pth. The corresponding config of the model is resnet18_8xb32_in1k.py
After the above work is done, the structure of the current working directory should be:
.
|-- mmpretrain
|-- mmdeploy
|-- resnet18_8xb32_in1k_20210831-fbbb1da6.pth
ONNX Runtime
In order to use ONNX Runtime backend, you should also do the following steps.
Install
mmdeploy(Model Converter) andmmdeploy_runtime(SDK Python API).pip install mmdeploy==1.3.1 pip install mmdeploy-runtime==1.3.1
:point_right: If you have installed it before, please uninstall it first.
Install onnxruntime package
pip install onnxruntime==1.8.1
Download
onnxruntime, and add environment variable.As shown in the figure, add the lib directory of onnxruntime to the
PATH.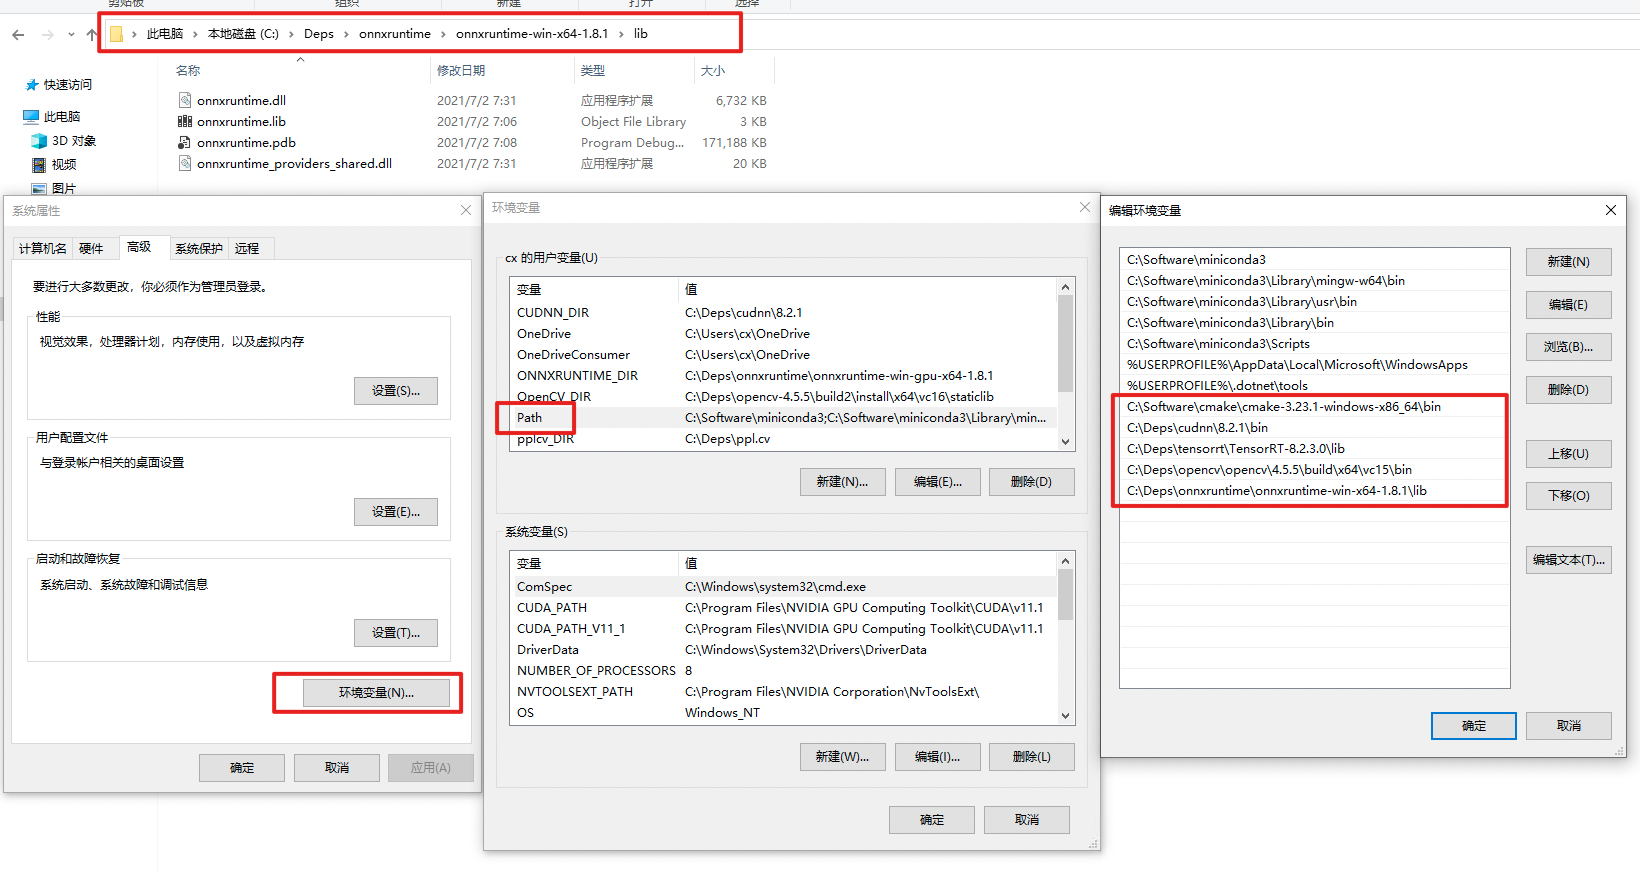 :exclamation: Restart powershell to make the environment variables setting take effect. You can check whether the settings are in effect by
 echo $env:PATH.Download SDK C/cpp Library mmdeploy-1.3.1-windows-amd64.zip
TensorRT
In order to use TensorRT backend, you should also do the following steps.
Install
mmdeploy(Model Converter) andmmdeploy_runtime(SDK Python API).pip install mmdeploy==1.3.1 pip install mmdeploy-runtime-gpu==1.3.1
:point_right: If you have installed it before, please uninstall it first.
Install TensorRT related package and set environment variables
CUDA Toolkit 11.8
TensorRT 8.6.1.6
cuDNN 8.6.0
Add the runtime libraries of TensorRT and cuDNN to the
PATH. You can refer to the path setting of onnxruntime. Don’t forget to install python package of TensorRT.:exclamation: Restart powershell to make the environment variables setting take effect. You can check whether the settings are in effect by echo
$env:PATH.:exclamation: It is recommended to add only one version of the TensorRT/cuDNN runtime libraries to the
PATH. It is better not to copy the runtime libraries of TensorRT/cuDNN to the cuda directory inC:\.Install pycuda by
pip install pycudaDownload SDK C/cpp Library mmdeploy-1.3.1-windows-amd64-cuda11.8.zip
Model Convert
ONNX Runtime Example
The following describes how to use the prebuilt package to do model conversion based on the previous downloaded pth.
After preparation work, the structure of the current working directory should be:
..
|-- mmdeploy-1.3.1-windows-amd64
|-- mmpretrain
|-- mmdeploy
`-- resnet18_8xb32_in1k_20210831-fbbb1da6.pth
Model conversion can be performed like below:
from mmdeploy.apis import torch2onnx
from mmdeploy.backend.sdk.export_info import export2SDK

img = 'mmpretrain/demo/demo.JPEG'
work_dir = 'work_dir/onnx/resnet'
save_file = 'end2end.onnx'
deploy_cfg = 'mmdeploy/configs/mmpretrain/classification_onnxruntime_dynamic.py'
model_cfg = 'mmpretrain/configs/resnet/resnet18_8xb32_in1k.py'
model_checkpoint = 'resnet18_8xb32_in1k_20210831-fbbb1da6.pth'
device = 'cpu'

# 1. convert model to onnx
torch2onnx(img, work_dir, save_file, deploy_cfg, model_cfg,
  model_checkpoint, device)

# 2. extract pipeline info for sdk use (dump-info)
export2SDK(deploy_cfg, model_cfg, work_dir, pth=model_checkpoint, device=device)
The structure of the converted model directory:
.\work_dir\
`-- onnx
    `-- resnet
        |-- deploy.json
        |-- detail.json
        |-- end2end.onnx
        `-- pipeline.json
TensorRT Example
The following describes how to use the prebuilt package to do model conversion based on the previous downloaded pth.
After installation of mmdeploy-tensorrt prebuilt package, the structure of the current working directory should be:
..
|-- mmdeploy-1.3.1-windows-amd64-cuda11.8
|-- mmpretrain
|-- mmdeploy
`-- resnet18_8xb32_in1k_20210831-fbbb1da6.pth
Model conversion can be performed like below:
from mmdeploy.apis import torch2onnx
from mmdeploy.apis.tensorrt import onnx2tensorrt
from mmdeploy.backend.sdk.export_info import export2SDK
import os

img = 'mmpretrain/demo/demo.JPEG'
work_dir = 'work_dir/trt/resnet'
save_file = 'end2end.onnx'
deploy_cfg = 'mmdeploy/configs/mmpretrain/classification_tensorrt_static-224x224.py'
model_cfg = 'mmpretrain/configs/resnet/resnet18_8xb32_in1k.py'
model_checkpoint = 'resnet18_8xb32_in1k_20210831-fbbb1da6.pth'
device = 'cpu'

# 1. convert model to IR(onnx)
torch2onnx(img, work_dir, save_file, deploy_cfg, model_cfg,
  model_checkpoint, device)

# 2. convert IR to tensorrt
onnx_model = os.path.join(work_dir, save_file)
save_file = 'end2end.engine'
model_id = 0
device = 'cuda'
onnx2tensorrt(work_dir, save_file, model_id, deploy_cfg, onnx_model, device)

# 3. extract pipeline info for sdk use (dump-info)
export2SDK(deploy_cfg, model_cfg, work_dir, pth=model_checkpoint, device=device)
The structure of the converted model directory:
.\work_dir\
`-- trt
    `-- resnet
        |-- deploy.json
        |-- detail.json
        |-- end2end.engine
        |-- end2end.onnx
        `-- pipeline.json
Model Inference
You can obtain two model folders after model conversion.
.\work_dir\onnx\resnet
.\work_dir\trt\resnet
The structure of current working directory:
.
|-- mmdeploy-1.3.1-windows-amd64
|-- mmdeploy-1.3.1-windows-amd64-cuda11.8
|-- mmpretrain
|-- mmdeploy
|-- resnet18_8xb32_in1k_20210831-fbbb1da6.pth
`-- work_dir
Backend Inference
:exclamation: It should be emphasized that inference_model is not for deployment, but shields the difference of backend inference api(TensorRT, ONNX Runtime etc.). The main purpose of this api is to check whether the converted model can be inferred normally.
ONNXRuntime
from mmdeploy.apis import inference_model

model_cfg = 'mmpretrain/configs/resnet/resnet18_8xb32_in1k.py'
deploy_cfg = 'mmdeploy/configs/mmpretrain/classification_onnxruntime_dynamic.py'
backend_files = ['work_dir/onnx/resnet/end2end.onnx']
img = 'mmpretrain/demo/demo.JPEG'
device = 'cpu'
result = inference_model(model_cfg, deploy_cfg, backend_files, img, device)
TensorRT
from mmdeploy.apis import inference_model

model_cfg = 'mmpretrain/configs/resnet/resnet18_8xb32_in1k.py'
deploy_cfg = 'mmdeploy/configs/mmpretrain/classification_tensorrt_static-224x224.py'
backend_files = ['work_dir/trt/resnet/end2end.engine']
img = 'mmpretrain/demo/demo.JPEG'
device = 'cuda'
result = inference_model(model_cfg, deploy_cfg, backend_files, img, device)
Python SDK
The following describes how to use the SDK’s Python API for inference
ONNXRuntime
python .\mmdeploy\demo\python\image_classification.py cpu .\work_dir\onnx\resnet\ .\mmpretrain\demo\demo.JPEG
TensorRT
python .\mmdeploy\demo\python\image_classification.py cuda .\work_dir\trt\resnet\ .\mmpretrain\demo\demo.JPEG
C SDK
The following describes how to use the SDK’s C API for inference
ONNXRuntime
Add environment variables
Refer to the README.md in sdk folder
Build examples
Refer to the README.md in sdk folder
Inference:
It is recommended to use
CMDhere.Under
mmdeploy-1.3.1-windows-amd64\\example\\cpp\\build\\Releasedirectory:.\image_classification.exe cpu C:\workspace\work_dir\onnx\resnet\ C:\workspace\mmpretrain\demo\demo.JPEG
TensorRT
Add environment variables
Refer to the README.md in sdk folder
Build examples
Refer to the README.md in sdk folder
Inference
It is recommended to use
CMDhere.Under
mmdeploy-1.3.1-windows-amd64-cuda11.8\\example\\cpp\\build\\Releasedirectory.\image_classification.exe cuda C:\workspace\work_dir\trt\resnet C:\workspace\mmpretrain\demo\demo.JPEG